
We test each and every drive before we ship it. While this makes it highly unlikely you will encounter a problem, things still happen. Please select your problem below and see if we have a solution for your problem. If not, use the Contact button at the top right of the site to let us know and we will get right on it.
USB/MicroSD/DVD media in general
Nothing happens / files missing when you insert the drive/disc in Windows
- Most of our drives have a light on them that comes on when you insert them. This helps verify that the drive is seen.
- For drives designed to be used in Windows, open Windows File Explorer to see if your computer sees the drive. If so, open the drive and see if you can access it.
- For drives/DVDs that contain Linux (Ubuntu, Mint, Kali, Black Arch, etc) these are designed to be booted to and not used inside of Windows. In fact, attempting to use them inside Windows may actually damage them.
The USB drive does not function with my Apple, Android, Chromebook, etc
With the exception of our macOS specific drives (which show macOS clearly in the images, title, and description), our USB drives are not designed to work with these devices and this is clearly marked in our listings. If you missed that and now bought something you can not use, contact us, and we can arrange a return and refund(minus shipping both ways, of course).
Can not boot to the USB drive, DVD, or floppy on a PC
In order to boot to a USB drive, DVD, or floppy, you probably need to tell your computer to boot from a different source. This usually means pressing a key repeatedly while turning the computer on.
For Dells, this is typically the F12 key, For HPs, try the ESC key, For many custom-built computers, this might be the F8 key, If this does not work, or for other brand computers, see your computer documentation.
Unless otherwise noted in the listing for the item you purchased (for example, versions of FreeDOS), all of our USB drives are designed to boot in UEFI mode. When you boot your computer and press the appropriate key to get to your boot menu, you may see something like the following:

In the above example of a Dell computer, #1 shows the USB drive under the UEFI section. This is where you should select a USB drive to boot from.
#2 shows the same USB drive under the “LEGACY BOOT” section, and you should not select this for most of our USB drives, however this is the correct place to select an older DVD or floppy disk.
You should make sure that #3 shows OFF if it is displayed, as secure boot can prevent the computer from booting from external devices. ***If Secure Boot needs to be disabled and BitLocker is turned on, it’s important to have the BitLocker recovery key in order to recover after turning off secure boot and trying to boot into the OS of the device. Without the recovery key, you will not be able to boot back into the laptop. You must have the recovery key (not your password or PIN) in order to proceed without losing all of your data.***
If you do not know what a BitLocker recovery key is or do not know where yours is, contact your computer manufacturer for assistance before proceeding.
If it is on, you can change it by selecting #4. Please note that changing your boot mode settings can prevent your computer from booting to its installed OS and should only be done by experienced users.
If you do not see a boot menu, you may not have pressed the right key or key combination. Some computers require you to press a Fn key plus the boot menu key. For example, Fn+F12 (press both keys at the same time). The Fn key is often in the lower left side of your keyboard and sometimes has different colored text, for example, blue.
If you have a Lenovo, you may have a “Novo Button”. Most of these require the computer to be off, and then you press the Novo Button to go straight to Novo Button Menu where you can choose the “Boot Menu”. The Novo button is often on the side of the laptop, or near the power button. Note that not all Lenovo laptops have these buttons.
Another issue was reported that their BIOS had two settings for booting to a USB; Stick and Hard Drive. The user reported, “It was set to boot to a USB stick and when I changed it to the USB hard drive option it worked.” This issue was with an Ubuntu Linux USB.
Error message when booting to USB
The most common error message reported is this one:
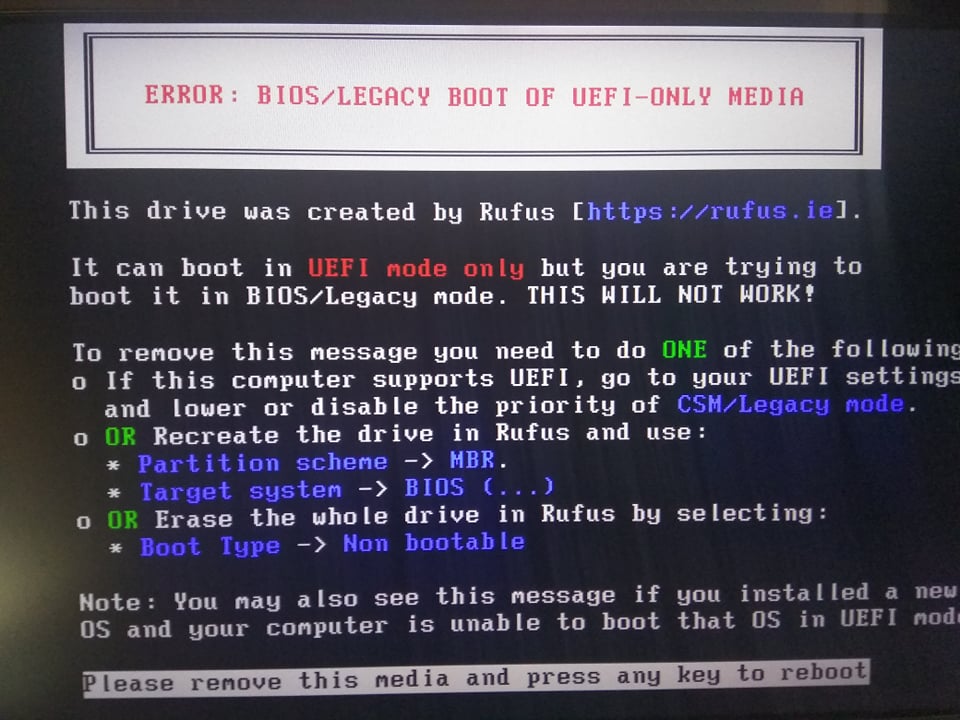
Older computers boot to CSM or Legacy mode, the USB you are trying to boot to requires UEFI boot mode to operate. This is noted in the listing for the item you purchased. The fix is to boot into your BIOS and change the boot mode to UEFI but this will prevent whatever operating system is installed on the computer already from functioning.
You may also receive an error message similar to this one:
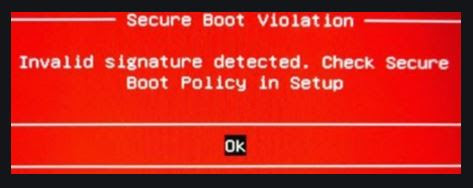
And this indicates that you have Secure Boot turned on in the BIOS and so the computer will refuse to boot to any device that is not in the secure boot listing. Your option here is to disable secure boot which will allow any device, including both your existing operating system and the USB to boot.
Please note that error messages can vary from computer to computer so if yours mentions secure boot but looks completely different, it is likely the same issue and will use the same solution.
What is a “Live” USB or DVD and what is “persistence”?
The term “Live” refers to the ability of the operating system on the USB drive to boot and work completely off of the USB drive, without touching the operating system and data on your computer’s internal storage (a hard drive or SSD).
This allows you to try and use the software without fear of damaging or losing data you already have.
You may also hear the term “Persistent” when used with a Live USB and this refers to the ability of the operating system on the USB to save settings, data, and/or configuration information to the USB drive. Again, this does not touch the data on your computer’s internal storage.
Persistence is usually something you want to avoid when you are using operating systems like TAILS, Kali, Black Arch, or other privacy or hacking systems. None of my hacking or privacy-related USB drives have persistence.
Compatibility issues with DVDs
All of our single-layer DVDs (4.7GB and smaller) are DVD-R format discs which are the most compatible available. This, of course, does not mean they are 100% compatible with every DVD reader out there. If you can get the drive to boot other DVDs but not the one you purchased from us, then the first thing to do is to find out if your DVD drive can read DVD-R disks (that is DVD minus R). You may have one of the older drives that could only do DVD+R.
Our larger DVDs (over 4.7GB) will be burned on DVD+R DL format discs which are compatible with virtually all DVD readers that can read DL (dual-layer) discs. Again, not all DVD readers can do this, particularly very old DVD readers.
If you are having issues with your drive reading our discs, please find the model number of your DVD drive (it should be on a sticker on the drive, or you can find it in the Windows Device Manager if the computer is loaded with Windows and working) and contact us with that information for assistance.
Floppy disk will not work
Floppies have a unique problem and that is that the heads shift over time and can cause misalignment of the head to the tracks on the disk.
To explain this a little better, over time the head assembly (the part that reads and writes to your disks) is heated and cooled hundreds of times. The metal used in this is very thin and light weight so it deforms after repeated heating and cooling cycles.
Most of the time when this happens your drive will continue to read and write just fine on its own. Where it becomes a problem is when you attempt to read from or write to a disk that will be or has been used in another computer.
Computer A may be able to read and write to disk A just fine, and computer B may be able to read and write to disk B just fine, but computer A may have problems reading from and writing to disk B.
Our disks are written on a brand new USB floppy drive, and tested on another brand new USB floppy drive to make sure that the disks are in perfect working order before shipping. If you are having a problem reading them then the floppy drive you have may be out of alignment. You may be able to align your drive by following these directions https://polprog.net/blog/fdalign/
An alternative is to replace your floppy drive with a newer one, or a new USB model.
If you have aligned your drive and still have issues with the disk, it is possible that something happened to the disks in transit and you can contact us for more information including possible replacement.
Be advised, floppy drives going out of alignment is a very common issue so we will not ship replacement disks unless we are convinced you have aligned your drive properly. If we did not do this, a large percentage of people would just ask for replacement disks instead of fixing their drives, which would cause us to stop selling the disks at all because we would be losing money.
FreeDOS installation
DOS is an older operating system that does things a little differently. You must first boot to the USB or Floppy media to begin the installation process.
Please note, following these directions to install FreeDOS onto your hard drive will destroy all other data on your hard drive including any other operating system, documents, applications, files, absolutely everything.
The first thing you need to do is to select Exit to DOS when you see that prompt, you do not want to install on the first try, it will fail.
Once you have exited to the DOS prompt you need to enter FDISK and press enter.
Inside FDISK you need to select the hard drive, look at what partitions are there, delete all the existing partitions, and then create a new partition for DOS.
At this point you will need to reboot the computer to the USB or Floppy again, and once again select Exit to DOS.
Now you need to format the partition you created by using the “Format d: /s” command. This assumes that D: is the new partition you created which you can verify by opening FDISK again and looking.
Now you should run the Setup.bat file on the USB and complete the setup process making sure to tell it to recreate the MBR. This will install all of the software and utilities to your hard drive. Once complete, you can reboot and remove the USB drive and boot directly to your hard drive.
Enjoy!
Specific USB/MicroSD products-
Windows Drivers USB
How do I use this?
This product is really easy to use, just follow these steps:
-
- Turn on your computer and log into Windows
-
- Insert the USB drive
-
- Normally a window will pop up displaying the contents of the drive, double-click on “drivers.bat”
-
- If nothing pops up, open Windows File Explorer and navigate to the USB drive, then double-click on the “drivers.bat” file
-
- Normally a window will pop up displaying the contents of the drive, double-click on “drivers.bat”
-
- Windows may ask you if you are sure you want to run this file, select Yes or Allow
-
- Once the program screen is up it will search for updated drivers for your devices
-
- Select the devices you want to update, or click on the yellow “Select All” button in the upper right
-
- Click on the green “Install” button in the upper right corner
-
- Reboot once it is done installing your new drivers!
That’s it!
It is not finding anything to install or update
It is possible that all of your devices are updated already, or that you are running the software on unsupported hardware. It does not work on Mac/Apple products, Chromebooks, iOS/Android tablets, or many virtual machines.
If you are working on a standard Windows computer and it still does not show anything to install or update, you can find more support at: https://sourceforge.net/p/snappy-driver-installer/discussion/
If you have problems that are not solved here, please let us know.
It does nothing
Look up above for the section titled “USB drives in general” and that should help you get started.
Kali, BlackArch, ParrotOS Linux USB/MicroSD
What is the password to log in?
Kali
The Kali defaults as the drive is shipped should be a username of kali and a password of kali, all lowercase.
BlackArch
The BlackArch defaults as the drive is shipped should be a username of root and a password of blackarch, all lowercase.
If that does not work, try checking the current installation documentation at https://blackarch.org/blackarch-install.html
Why does Kali not show Ethernet or wireless network?
Quite often when you first load Kali it will not show any network adapter at all. We have a Pi 3 that does this. The fix is rather simple….
In your file browser, browse to etc/network, right-click and select open as root, and type in your root password (kali by default). Now double-click on the interfaces file. At the bottom of the file, on a new line, type the following:
auto eth0
iface eth0 inet dhcp
Save the file and then reboot your Pi. You should now have both Ethernet and wireless networking.
MacOS USB Drives
How do I boot to my MacOS USB Drive
Shut down your Mac, turn on the computer and wait for the gong, press and hold the Option key on your keyboard until the startup menu appears then release the key. Use the arrow keys to switch between the options, and press enter when the arrow is pointing to the option you want.
The MacOS version I ordered does not show up in the startup menu
Some Macs can be a little picky and we have had to restart them a couple of times before they pick up the USB drive. This is not all the time and not on every Mac. You might also try a different USB port. Every single USB drive we ship has been individually tested so I would go with the assumption the drive is good.
You should also be patient. Sometimes, particularly on older machines, it can take a minute or two for it to read the USB and figure out what it is. After you let the machine sit there for a minute, it may add it to the startup menu.
If, however, you still can not get it to work, contact us for assistance and we will help you or replace the drive if it is faulty.
This Copy of the Install OS X El Capitan Application Can’t be Verified
While we try to always have a “fresh” copy of the installer shipped to you, it is possible that one slips through that is a little older or you may keep the installer around for a while before you need it. When this happens, the certificate may expire before you get a chance to use it. In that case, there are a couple of simple ways to use it anyway just by changing the date on your computer. Our current batch is from May 8th, 2022.
For detailed instructions on this, please see this article.
“macOS cannot verify that this app is free from malware” or “unidentified developer”
On occasion, a file or set of files you receive may exhibit these warnings that simply mean your Mac doesn’t recognize the security information on those files. To bypass this error and continue using your product there are a couple of different things you can do.
For detailed instructions, please see this article.
Upgrade from MacOS 10.5 Leopard to 10.11 El Capitan does not work
You can not directly upgrade from 10.5 to 10.11 according to Apple. You need to upgrade from 10.5 to 10.6 first, and then assuming your computer meets the system requirements for 10.11, you can then make that upgrade.
There is another way to force the upgrade, but we do not recommend or encourage you to use it. If you absolutely must, then you can find instructions in this article.
Linux for Beginners
Basic Linux information
Linux is an operating system, like Microsoft Windows, Apple MacOS, or Google ChromeOS. As such, it is designed to run your computer and not run like an application such as Microsoft Word or Intuit Quicken.
Learning a new operating system from scratch can seem overwhelming so take it slow. I recommend that you start off by running Linux in “live” mode, which means you boot from the DVD or USB drive and use the operating system there instead of installing it on your computer’s hard drive.
The advantage of this is that you can learn without hurting the data on your computer. Once you get comfortable using Linux, then you can make the decision on installing it or not.
To learn more about Linux, I suggest the following Resources:
The Ubuntu Complete Beginner’s Guide Video
Complete Linux Mint Tutorial Videos (a little old but excellent)
Official Linux Mint documentation
Official Ubuntu Linux documentation
If you want to talk to people in real-time about Linux and get some help pretty quickly, try The Linux for all Discord channel: https://discord.com/invite/qXPMFqCu
Good luck!